Set Firefox to Use Remote DNS

An instruction showing how to set Firefox to use remote DNS. Use Firefox’s advanced settings to set the remote DNS option of socks proxy.

Question: How can I set Firefox to use remote DNS when I use socks proxy in Firefox?

Answer:

1. Search “proxy” on the Firefox options page. Then click the “Settings” button for its “Network Settings” to view Firefox’s proxy options.

Firefox Network Options

2. Check the option “Proxy DNS when using SOCKS v5”.

Firefox Remote DNS
Firefox Remote DNS

What Program Changed Proxy Settings?

Follow this instruction to find what program changed proxy settings on your computer.

Question: I’m using your program My IP Hide to change the IP address. But after a few seconds, my proxy settings will be restored to direct connection. What is the problem?

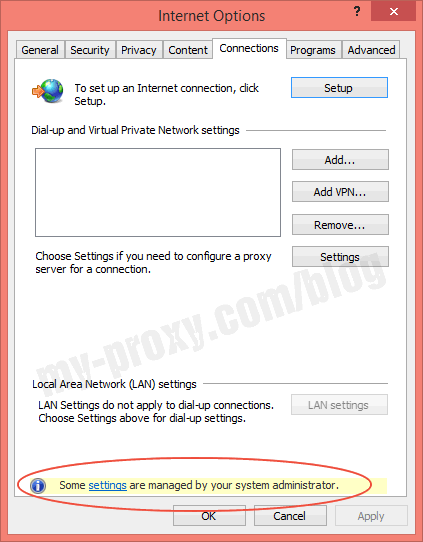
Answer: It seems that some program reverts your proxy settings. Follow this instruction to find what program changed your proxy settings.

First, you need the program Process Monitor. Download it from here: https://download.sysinternals.com/files/ProcessMonitor.zip

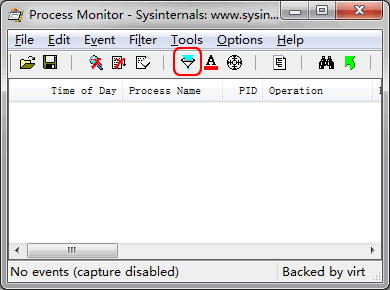
1) Run it. You will see this dialog. Click the “Filter” button.

Monitor Proxy Settings

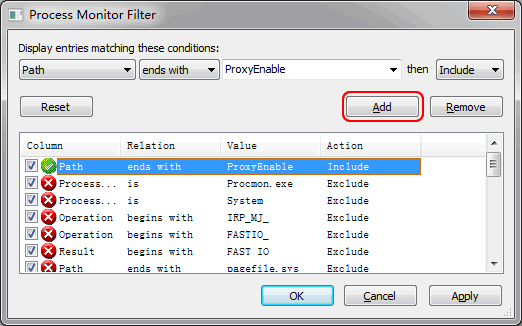
2) Add a filter rule. Show the entries whose path ends with “ProxyEnable”. Please type in the “ProxyEnable” by yourself. Then click “Add” and “OK” buttons.

Filter Proxy Settings

3) Click the “Start” button to start monitoring your system.

Program Changed Proxy Settings

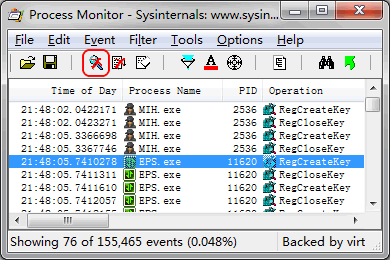
4) Enable MyIPHide now. When MyIPHide says your proxy settings are changed by another program, click the “Start” button again to stop the monitor. Now see what program is shown there.

In that screenshot, you can see Elite Proxy Switcher (EPS.exe) changed the proxy settings besides My IP Hide (MIH.exe).

My IP Hide Video Tutorial

My IP Hide is a proxy software helping you to hide IP and unblock facebook, youtube, bbc or other sites. It supports both Windows and Mac. It will change your IP to an US or UK IP address.

Just keep My IP Hide (MIH) running when you surf the Internet. MIH will hide your real IP. Here is the video tutorial for Windows edition.

My IP Hide also supports the Macintosh system. Here is the video tutorial for Mac users.

Main Features

  • Hide Real IP: My IP Hide can hide your IP to protect your online privacy and use encrypted connections to prevent Internet tracking from you.
  • Unblock Sites: Open any blocked websites. Webmasters may ban your IP. Company may limit your access to some sites. We break all the blockade for you.
  • Faster than VPN: With our enhanced proxy technology, My IP Hide is faster than VPN, SSH proxy and web proxy. Meanwhile it’s more secure than ordinary proxy.
  • Windows and Mac: My IP Hide supports both Windows and Mac. It supports all the browsers. There is no settings for the major browsers.

Forum Proxy Leecher Video Tutorial

Forum Proxy Leecher (FPL) is an intelligent proxy leecher that can extract proxies from various proxy sites and proxy forums even if the proxies are in the attachment.

Quick Guide

1) Logged into the forums with Internet Explorer (not Firefox or Opera).
2) Please select “Log me on automatically each visit” when login.
3) Use IE to view the topics to make sure you have the right to see the proxies
4) Click the “Start” button in FPL to start leech that forum.

After you login the forums, FPL can read your account information from IE. In fact FPL tries to act just as IE. It’s same for the forum whether you use FPL to leech or open another IE to read the topics one by one from the forum. Here is a video tutorial showing its basic functions. You can also download the tutorial here.

Main Features

  • Quickly get fresh proxies when you need
  • Support different types of forums
  • Support scanning attachments
  • Support non-forum proxy sites
  • My-Proxy team maintains the leech list for you
  • Powerful proxy tester especially for huge list
  • Nice user interface and easy to use

Proxy Hunter Tutorial With Pictures

We usually get large numbers of proxies from websites or forums. We are sharing other people’s achievement. Do you want to find proxies by yourself? If so, Proxy Hunter can help you as long as you have enough patience and online time.

Download Proxy Hunter

Proxy Hunter is a classical and powerful tool for scanning and verifying proxies. Download Proxy Hunter here if you don’t have it.

We will focus on the scan function which is the specialty of Proxy Hunter. You can test the found proxies with oher tools such as Elite Proxy Switcher.

Use Proxy Hunter

Now let us begin. After the installation process, you can start the software and a warning dialog will show as below.

Proxy Hunter warning

You can see this main menu of Proxy Hunter after pessing “Let me in!” button.

Proxy Hunter main window

Press the “Add task” button to add a new scan task.

Proxy Hunter add task

Choose “Searching task” for task type and press “next”. You will see this dialog.

Proxy Hunter add task step 2

Add IP ranges to scan using “add” button. You will see this dialog “Add searching IP range”.

Proxy Hunter add range

Choose “start-end” in the “range type” and enter IP addresses in the “Start addr” and “End addr”. For example, you can use 144.92.0.0 as “Start addr” and 144.92.255.255 as “End addr” to scan free proxies in US Wisconsin University. If you do not know the IP range, please refer to here. Press “next” after adding the IP range you want to scan. Then you will see this dialog.

Proxy Hunter add task step 4

Add ports to scan using “add” button. You will see this dialog “Add port and protocol”.

Proxy Hunter add port

Choose the “port range”(actually it’s “single port”, it’s a bug) and fill in the port. Press “OK” after doing that. You will have to use this dialog several times to add these commonly used ports: 8080,80,3128,1080. The more ports you add the more proxies you will find, but too many ports will make the scan process lengthy.

Press “Finish” in “Add scan task 3” and you will return to the “Main menu”. Now you can press the “Start scan” button and go to sleep:) Next morning you will find that you have got a lot of proxies in the “Result manager” page.

Proxy Hunter result

Now you can output the result and test it with other tools. And I should tell you that a majority of the result is trashy. The picture above shows the test result by Proxy Hunter. Tip: You can add the “parellel socks” (max thread) number to speed up your searching in the “Setting menu”.

Proxy Hunter settings

Alternative Software

Proxy Hunter is a good tool for those people who have enough time and patience and it’s usually the ultimate source of the fresh proxies. If you don’t have much time or patience, you can try another great tool, Forum Proxy Leecher. It’s much faster and easier to use. You can also buy proxy from us. It’s the easiest way to get fresh daily proxy.

Multiproxy Tutorial with Pictures

MultiProxy is a multifunctional personal proxy server that protects your privacy while on the Internet as well as speeds up your downloads, especially if you are trying to get several files form overseas or from otherwise rather slow server. It can also completely hide your IP address by dynamically connecting to non-transparent anonymizing public proxy servers. You can also test a list of proxy servers and sort them by connection speed and level of anonimity.

Get Multiproxy Program

If you do not have it, you can download multiproxy here. Install and run it. Now you will see its main menu. There is no working proxy now.

MultiProxy main menu

Import Proxy List

Now let’s add proxies to make multiproxy work. Click “Options” on the main menu and switch to the “Proxy servers list” page, you will see the following screen.

MultiProxy proxy list

Right click the white space | Files | Import proxy list… Do not have a proxy list file? You can find the free proxy list from My-Proxy.com then copy it and save it as a text file such as “proxy.txt”. You can also buy proxy list from My-Proxy.

Test the proxies you imported using Menu-> | Proxy list | Test all proxies.

MultiProxy test proxy list

Switch between Proxies

The proxies with a green point is working proxies. You can delete the unworking ones using Menu-> | Proxy list | Delete non-responding. You should import and test the proxies regularly because they always die quickly.

MultProxy listents on port 8088 by default, so you will need to configure your browser to connect to Internet via proxy server at address 127.0.0.1 (localhost) and port 8088.

For example, Internet Explorer 5.5: Tools | Internet Options… | Connections. Select either dial-up connection or LAN (depending on how you connect to the Internet), press Settings. Check the “Use Proxy Server” box– enter proxy address (127.0.0.1) and port (8088), click OK, click on the next OK.

Note: You must also uncheck the “Use HTTP 1.1” and “Use HTTP 1.1 through proxy connections” checkboxes in the Advanced tab of Internet Options dialog box.

Check Your IP

After correctly config the browser, you can goto http://www.find-ip.net using your configed browser to see whether the multiproxy is working. If everything is right, you can see the proxy IP is shown in the test page and the multiproxy main menu should be like this.

MultiProxy main menu working

You can disable multiproxy simply by right clicking its tray icon and choosing “Disable”.

MultiProxy disable

However you need to configure the browser to the original mode if you close multiproxy.

Alternative Proxy Software

If you need to switch proxy frequently, we recommend our proxy software Elite Proxy Switcher. The free edition should be enough for most users. Advanced users can buy the professional edition.