Question: How can I enable the remote DNS option when I use a socks proxy in Chrome?
Answer:
Chrome uses the system proxy settings by default. If you want to use different proxy settings, you can use an extension such as Proxy SwitchyOmega. But it can’t enable the remote DNS option for you.
There is a remote DNS option in Firefox. But Chrome doesn’t have it. To enable the remote DNS option, you have to add a command-line flag to your Chrome shortcut.
1. Right-click the Chrome icon on the desktop and click the “Properties” option.
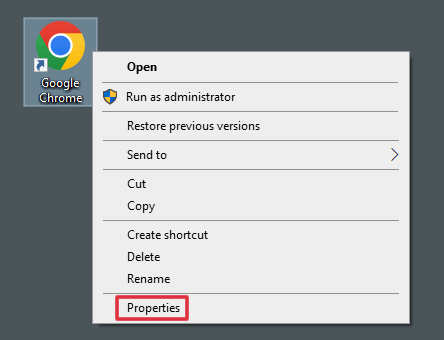
2. Add this command-line flag to the “Target” option.
--proxy-server="socks5://1.2.3.4:3000"
Important Notes:
- There are double ”-” in the command-line flag above.
- Add a space before the command-line flag. If you want to add a second command-line flag, start it with a space too.
- The proxy 1.2.3.4:3000 is just a demo, change to a real proxy.
The full command line should be like this one.
"C:\\Program Files (x86)\\Google\\Chrome\\Application\\chrome.exe" --proxy-server="socks5://1.2.3.4:3000"
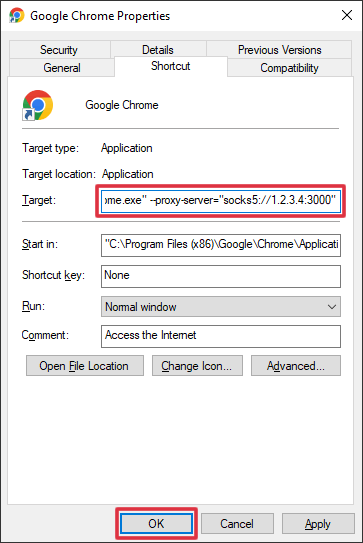
Now you are using a socks proxy in Chrome and the remote DNS is enabled. You can use Chrome to surf this website to confirm it https://www.find-ip.net
3. An optional command-line flag
According to this Chrome document, there may be some DNS requests leaking. To avoid it, you can add this command-line flag.
--host-resolver-rules="MAP * ~NOTFOUND , EXCLUDE ***1.2.3.4***"
Please replace 1.2.3.4 with the IP of your real socks proxy. Now the full command line should be like this one.
"C:\\Program Files (x86)\\Google\\Chrome\\Application\\chrome.exe" --proxy-server="socks5://1.2.3.4:3000" --host-resolver-rules="MAP * ~NOTFOUND , EXCLUDE 1.2.3.4"